


How to Create and Optimize a GitHub Account: A Step-by-Step Guide
GitHub is one of the most popular platforms for managing and sharing code in the world today. It allows developers, students, and tech professionals to keep track of their projects, collaborate with others, and showcase their work to a global audience. Whether you are just starting out with coding or are an experienced programmer, having a GitHub account is an essential tool that can help you organize your work, contribute to open-source projects, and connect with other developers.
In this article, we will guide you through the entire process of creating a GitHub account, step by step. You’ll learn how to sign up, choose a username, and verify your account. Beyond just creating an account, we’ll also show you how to personalize your profile by adding a bio and profile picture, so you can make a great first impression. You’ll discover how to set or change your GitHub email and username to keep your account up to date.
Additionally, we’ll walk you through creating your very first repository-a crucial step to start managing your code on GitHub. For those who use Visual Studio, we’ll explain how to connect your GitHub account to the IDE, making it easier to push and pull code without leaving your development environment. Finally, you’ll learn how GitHub can be used to sign up for other popular developer services, streamlining your workflow across multiple platforms.
By the end of this guide, you’ll have a fully set-up GitHub account and be ready to start collaborating, sharing, and growing as a developer. Whether you want to contribute to open-source projects, build your portfolio, or simply keep your code organized, this article will give you the foundation you need to get started with GitHub.
What Is a GitHub Account?

A GitHub account is your personal identity on GitHub, a popular platform used by developers to host, share, and collaborate on software projects. When you create a GitHub account, you gain access to tools that allow you to manage your own code repositories, contribute to others’ projects, track issues, and participate in the developer community.
With a GitHub account, you can create repositories to store your code, collaborate with others through features like pull requests and code reviews, and showcase your work publicly or privately. The account also serves as your profile, where others can see your contributions, projects, and activity. Whether you are an individual developer, part of a team, or running an organization, having a GitHub account is essential for engaging with the vast ecosystem of open-source and private software development.
To learn more, visit the GitHub homepage.
Git vs GitHub
Git is a distributed version control system that developers install and use locally to track changes in code, manage different versions, and collaborate on projects. It allows you to create branches, merge changes, and maintain a complete history of your project directly on your own computer, even when offline. Git keeps track of every modification, enabling you to revert to previous versions, see who made changes, and understand why those changes were made.
On the other hand, GitHub is a cloud-based platform built around Git. It hosts Git repositories online, making it easy for individuals and teams to collaborate from anywhere with internet access. GitHub provides additional features such as issue tracking, pull requests, and code reviews through a user-friendly web interface. This platform adds social and project management tools that simplify teamwork and sharing code with others.
While Git operates locally on your computer and works offline, GitHub requires an internet connection to access its full range of collaborative features. Git focuses on the technical aspects of version control, whereas GitHub enhances collaboration by providing a centralized place to host repositories and manage projects with built-in tools for communication and coordination.
What You Can Do with a GitHub Account
A GitHub account opens up a wide range of possibilities for developers, teams, and anyone interested in software projects. One of the primary uses is managing your code through repositories. You can create repositories to store your projects, organize your files, and use Git’s powerful version control features to track changes over time. This allows you to experiment with new ideas safely by creating branches, merge improvements, and revert to previous versions if needed. GitHub’s intuitive interface makes it easier to visualize your project history and collaborate with others (GitHub Features).
Beyond managing your own projects, a GitHub account enables you to contribute to the vast world of open source software. Millions of public repositories are hosted on GitHub, covering everything from small utilities to large frameworks. You can explore these projects, fork repositories to create your own copies, and submit pull requests to propose changes or improvements. This collaborative environment encourages learning, networking, and contributing to software that impacts millions of users worldwide.
GitHub also serves as a powerful platform to showcase your skills and portfolio. By making your repositories public, you provide potential employers, collaborators, or clients with direct access to your code and projects. You can enhance your repositories with detailed documentation, wikis, and README files that explain your work clearly. Additionally, GitHub Pages allows you to host personal or project websites directly from your repositories, giving you a professional online presence without needing separate web hosting (GitHub Features and Functionality).
Collaboration is at the heart of GitHub’s design. Whether you’re working solo or in a team, GitHub offers tools like issue tracking to manage bugs and feature requests, pull requests for code review and discussion, and project boards to organize tasks and milestones. These features help teams coordinate their work, maintain code quality, and streamline development workflows. GitHub also integrates with many third-party tools and services, making it a central hub for modern software development.
In summary, a GitHub account empowers you to manage code effectively, contribute to open source, build a professional portfolio, and collaborate seamlessly with others, making it an essential tool for developers at all levels.
How to Create a GitHub Account
Creating a GitHub account is quick and easy. Follow these steps to get started:
Step-by-Step GitHub Account Creation
Creating a GitHub account is a straightforward process that gets you started with managing code, collaborating on projects, and exploring the vast open-source community. Here’s a detailed step-by-step guide to help you through the process:
Visit GitHub’s Website
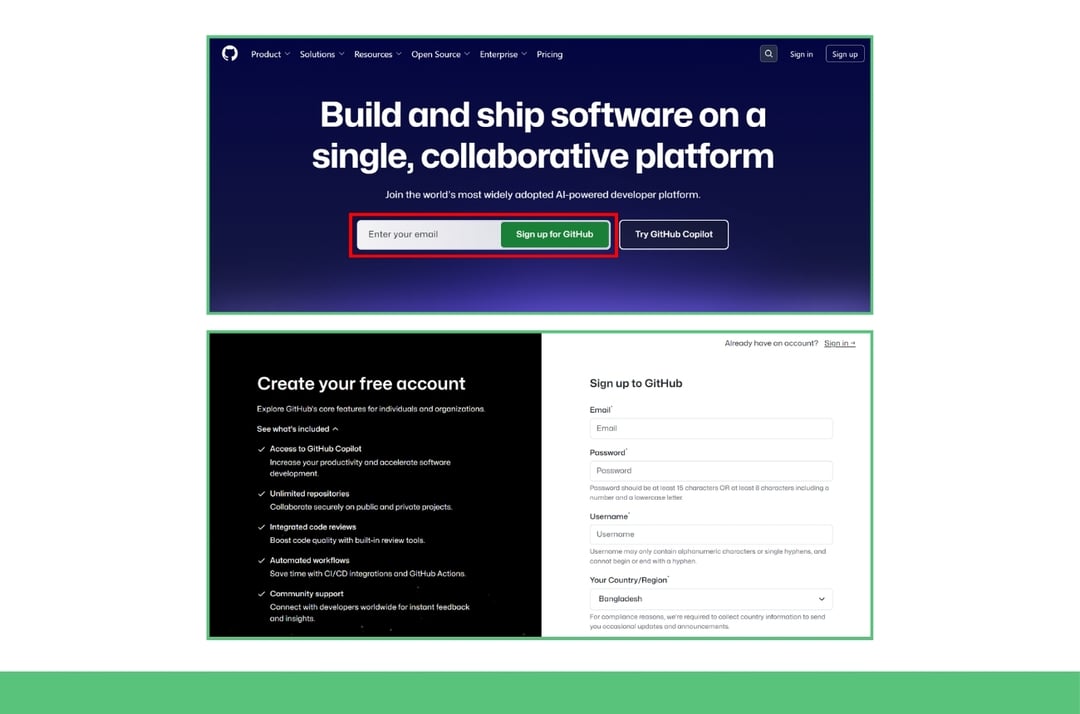
Open your web browser and go to github.com. On the homepage, locate and click the Sign up button, usually found at the top right corner. This will take you to the registration page.
Enter Your Email Address
On the sign-up page, enter a valid email address that you have access to. This email will be used for account verification and important notifications.
Create a Strong Password
Choose a strong and secure password. GitHub recommends using a combination of uppercase and lowercase letters, numbers, and special characters to enhance security. Avoid common or easily guessable passwords.
Choose a GitHub Username
Pick a unique username that will serve as your GitHub handle. This username will be visible to others and used in your profile URL (e.g., github.com/yourusername). GitHub will notify you if the username is already taken. Keep in mind that usernames cannot contain spaces or underscores, but hyphens and numbers are allowed.
Set Your Email Preferences
GitHub will ask if you want to receive product updates, announcements, and tips via email. You can choose to opt-in or skip this step based on your preference.
Verify You Are Not a Robot
To prevent automated sign-ups, GitHub will present a CAPTCHA or a simple puzzle to verify you’re a real person. Complete this verification to proceed.
Create Your Account and Verify Your Email
After completing the above steps, click the Create account button. GitHub will send a verification code to the email address you provided. Check your inbox (and spam folder, if necessary), then enter the code on the GitHub site to confirm your email.
Personalize Your Experience (Optional)
GitHub may ask a few questions about how you plan to use the platform-whether for learning, personal projects, or professional work. You can answer these to receive tailored recommendations or skip this step if you prefer.
Choose Your Plan
You will be prompted to select a plan. GitHub offers a free plan that includes unlimited public and private repositories, which is sufficient for most users. Paid plans add advanced features and increased storage but are optional and can be upgraded later.
Explore Your New Account
Once your account is set up, you’ll be taken to your GitHub dashboard. Here, you can customize your profile by adding a bio, profile picture, and links. You can start creating repositories, explore projects, and begin collaborating with others.
By following these steps, you’ll have a fully functional GitHub account ready to support your coding projects and collaborations.
GitHub Register Tips
When registering for GitHub, choose a username that is professional, simple, and memorable. Your username is your digital identity in the developer community and is visible to employers, collaborators, and anyone viewing your profile, so avoid using slang, jokes, or anything offensive (Feedbeater).
Using your real name or a variation (such as your first and last name, initials, or a professional handle) is often recommended, as it makes your profile more personal and credible (Codecademy, Reddit).
Try to keep your username short and easy to spell, which makes it easier for others to find and remember you (Feedbeater). Avoid using unnecessary numbers or special characters unless they are part of your brand.
When entering your email, use one you plan to associate with your code contributions and professional activity. This ensures you receive important notifications and that your contributions are correctly linked to your identity.
Finally, remember that your GitHub username and email can follow you throughout your career, so pick something you’ll be comfortable using long-term.
Set GitHub Email and Username
After creating your account, it’s important to configure your username and email settings correctly for seamless collaboration and contribution tracking.
How to Set or Change Username
Changing your GitHub username is a simple process but one that should be done thoughtfully, as it can affect your repositories, links, and collaborations. Here’s a detailed guide on how to set or change your GitHub username:
Log in to Your GitHub Account
Start by signing in to your GitHub account at github.com.
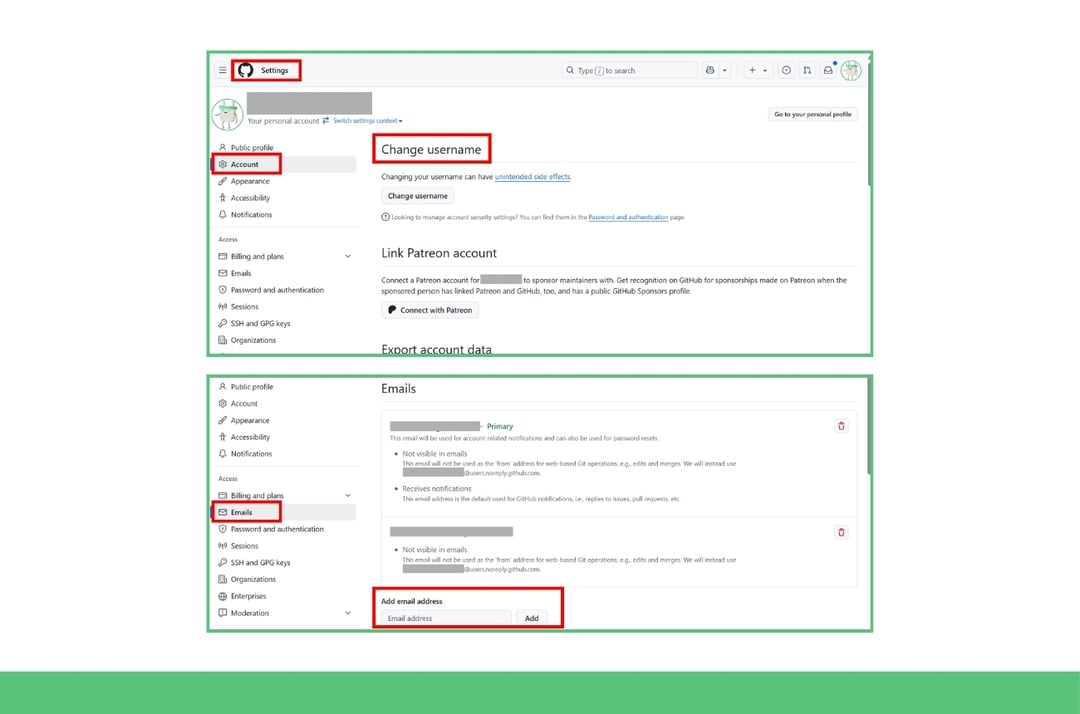
Access Your Settings
Once logged in, click on your profile photo or avatar located in the upper-right corner of the page. From the dropdown menu, select Settings. This will take you to your account settings page.
Navigate to Account Settings
In the left sidebar of the settings page, click on Account. This section contains options related to your personal account details, including your username.
Find the Change Username Option
Within the Account settings, you will see your current username displayed along with a Change username button or link. Click this to begin the process.
Enter a New Username
Type your desired new username into the provided field. GitHub will automatically check if the username is available. If the username is already taken, you will need to choose a different one.
Review Important Warnings
Before confirming the change, GitHub will display warnings about the consequences of changing your username.
These include:
- Your profile URL will change to reflect the new username.
- Repository URLs will also change, which means any existing links to your repositories will break unless redirects are properly handled.
- GitHub automatically sets up redirects from your old username URLs to the new ones, but it’s a good practice to update links wherever possible.
- Collaborators and integrations that rely on your username may need to be updated.
Confirm the Change
If you’re sure about the new username and understand the implications, confirm the change. You may be prompted to enter your password again for security purposes.
Update External Links and Notify Collaborators
After your username is changed, GitHub will immediately update your profile and repository URLs. However, it’s important to manually update any external links, documentation, or integrations that reference your old username. Inform your collaborators and teams about the change to avoid confusion.
Additional Tips
- Choose Your Username Carefully: Since changing your username can affect many aspects of your projects and collaborations, pick a username that you plan to keep long-term.
- Email and Username Are Separate: Changing your username does not affect your email address associated with your GitHub account. You can manage your email settings separately.
- Check for Impact on GitHub Pages: If you use GitHub Pages for hosting websites, verify that your site is still accessible after the username change and update any necessary configurations.
By following these steps, you can confidently update your GitHub username while minimizing disruptions to your projects and collaborations.
Setting Up GitHub Email
To add or update the email linked to your GitHub account, log in and click your profile photo in the upper-right corner. Select Settings, then in the sidebar, click Emails.
Here, you can add a new email address by typing it in and clicking Add. You can add multiple emails and choose which one to set as your primary address for notifications and web-based Git operations.
If you want your commits to be associated with your GitHub account, make sure any email you use in your local Git configuration is also added here. Remember, each email address can only be linked to one GitHub account at a time.
How to Set Up GitHub After Registration
Once your account is ready, personalize it and start working on projects.
Personalizing Your GitHub Profile
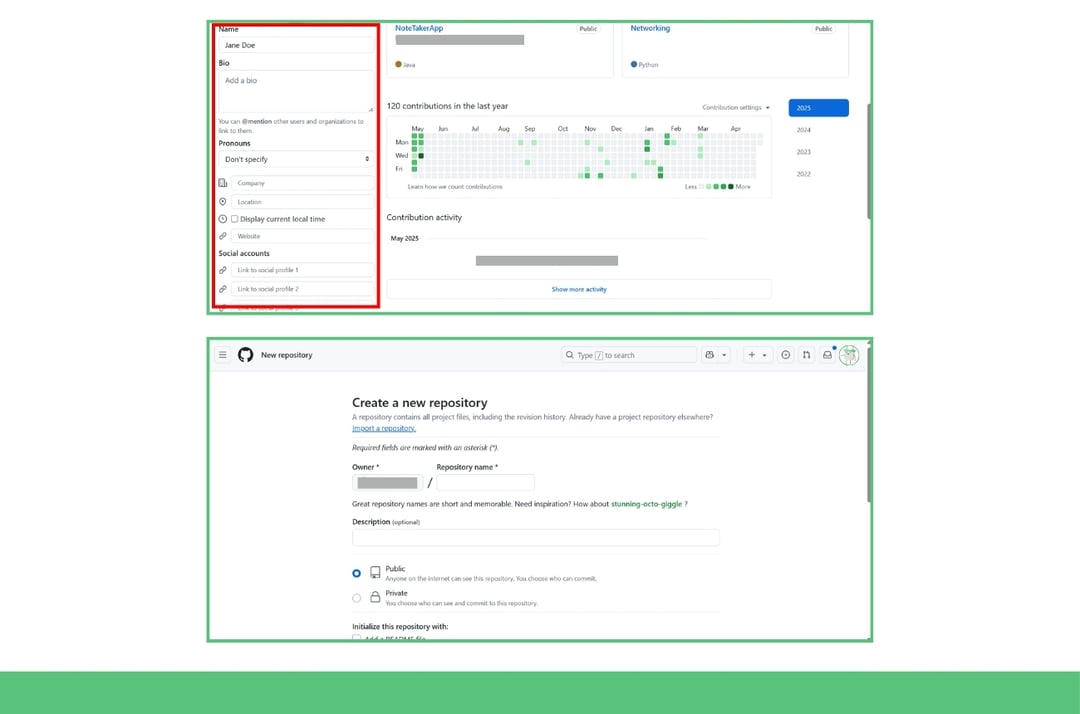
After registering, you can personalize your GitHub profile to make it more engaging and professional. Start by adding a bio, a profile photo, and links to other platforms or personal websites. You can do this by navigating to Settings > Public profile and updating the relevant fields. The bio field allows up to 160 characters, and you can include @mentions and emojis to share more about yourself or your work.
For a more detailed introduction, add a profile README. Create a public repository named exactly as your GitHub username and include a README file. This README appears at the top of your profile and can be customized with Markdown to showcase your skills, interests, and key projects (Managing your profile README).
You can also pin repositories and gists to your profile, highlighting your best or most relevant work for visitors to see quickly (How to have an awesome GitHub profile). If privacy is a concern, you can set your profile to private, which limits the information and activity visible to others.
A well-personalized GitHub profile not only helps you stand out but can also enhance your resume and demonstrate your skills directly to hiring managers and collaborators (How to Customize Your GitHub Profile Like a Pro!).
Creating Your First Repository
Creating your first repository on GitHub is a key step to begin managing and sharing your projects.
After logging into your GitHub account, you can start by clicking the + icon in the upper-right corner of the page and selecting New repository from the dropdown menu. This will take you to the repository creation page where you need to provide a name for your repository.
Choose a concise and meaningful name that reflects the project you want to work on, and you can also add an optional description to give visitors a quick overview of the repository’s purpose.
Next, you decide on the repository’s visibility. You can make it Public, which means anyone can see and access your code, or Private, restricting access only to you and collaborators you invite.
For beginners or open-source projects, public repositories are common, while private repositories are useful for personal or sensitive work.
You can also 'Fork' others' projects if needed. Forking refers to creating a copy of a repository within your own account or organization. It is helpful when you want a repository you like under your ownership as a copy. Remember, repositories that are forked more often tend to get more visitors. Getting your repositories forked can help you with an initial boost on GitHub.
If you want more forks for your repositories, check out SocialPlug's GitHub Forks Service!
It’s a good idea to initialize your repository with a README file. The README serves as the front page of your project, providing essential information such as what the project does, how to install or use it, and any other relevant details. Checking the box to add a README during repository creation saves you time and helps others understand your project right away.
Once you’ve filled in these details, click the Create repository button to finalize the process. Your new repository will be ready to use immediately.
From here, you can start adding files directly on GitHub or clone the repository to your local machine to work with Git commands or GitHub’s desktop tools. This setup lays the foundation for effective version control, collaboration, and project management on GitHub.
For more detailed guidance, you can refer to the official GitHub documentation on creating repositories.
Using GitHub on Visual Studio
To link GitHub with Visual Studio for seamless code pushes and pulls, first make sure you have a GitHub account and Visual Studio installed.
Open Visual Studio and go to Extensions > Manage Extensions to search for and install the GitHub Extension for Visual Studio if it’s not already included. Once installed, restart Visual Studio to activate the extension.
Next, sign in to your GitHub account directly from Visual Studio. Go to File > Account Settings (or Team Explorer > Manage Connections in some versions) and select the option to add an account. Choose GitHub, and you’ll be prompted to log in-either with your credentials or by authorizing via a web browser.
For enhanced security and compatibility, you may need to generate a Personal Access Token on GitHub and use it as your password when prompted.
After connecting your account, you can create, clone, or open repositories directly from Visual Studio. When you make changes to your code, use the built-in Git tools in Visual Studio to commit your changes locally.
To share your updates with others, simply push your commits to the linked GitHub repository. Likewise, you can pull the latest changes from GitHub to keep your local code up to date. Visual Studio’s Git integration also supports branch management, code reviews, and collaboration features, making it easy to work with others without leaving the IDE.
This integration streamlines your workflow, allowing you to manage repositories, push and pull code, and collaborate efficiently-all within Visual Studio.
Sign Up with GitHub for Other Services

Many popular development platforms allow you to sign up or log in using your GitHub account, which simplifies the registration process and enables seamless integration with your code repositories. This method leverages OAuth authentication, letting you use your existing GitHub credentials instead of creating new usernames and passwords for each service.
For instance, on Netlify, a popular platform for deploying and hosting modern web projects, you can click Sign up with GitHub on their signup page. This not only speeds up account creation but also allows Netlify to connect directly to your GitHub repositories. With this integration, you can set up continuous deployment pipelines that automatically build and publish your site whenever you push changes to your GitHub repo, making your workflow more efficient and automated.
Similarly, Heroku, a cloud platform for building, running, and managing apps, offers a Log in with GitHub option. By linking your GitHub account, you can deploy applications directly from your repositories, track changes, and trigger automatic deployments. This tight integration helps developers maintain smooth development cycles and reduces manual deployment steps.
Another example is StackBlitz, an online IDE that enables you to create, edit, and run projects instantly in the browser. Signing up with GitHub on StackBlitz lets you import your repositories with a single click and commit changes back to GitHub without leaving the platform. This seamless connection enhances productivity by combining coding, testing, and version control in one place.
Using GitHub to sign up for these and other services not only saves time but also unlocks powerful features like real-time syncing, automated builds, and easy collaboration. It creates a unified ecosystem where your code, deployments, and development tools work together smoothly, helping you focus on building great software instead of managing multiple accounts and workflows.
Conclusion
Creating a strong presence on GitHub starts with setting up your account, personalizing your profile, and creating your first repositories. This opens the door to learning, collaboration, and career growth. But to really stand out and attract more attention, you can boost your visibility with Socialplug’s GitHub services.
Socialplug helps you increase your GitHub stars and followers quickly and safely using real accounts-without needing to share your login details. Many users find that after using Socialplug, their repositories gain more credibility and visibility. This leads to more organic traffic, contributors, and active engagement with their projects.
By combining a well-prepared GitHub profile with Socialplug’s star and follower boosts, your projects will look more established and attract more developers and collaborators. This helps spark richer discussions and faster growth in the open-source community.
Start by creating and personalizing your GitHub account, then use Socialplug’s services to give your projects the real engagement and visibility they need to succeed. Don’t wait-take your GitHub journey to the next level today!

Tasnim is a content and digital marketer born in Dhaka, Bangladesh. For over thirteen years, Tasnim has worked as a freelancer for several social media marketing companies. He has acquired skill sets in copywriting, content marketing, SEO & social media marketing. He’s one of the founding members of SEOSkit, a very exciting search engine marketing startup. In his free time he likes to travel, read, and make failed attempts at music.

0 Comments
Great tips! I never realized how much engagement impacts growth more than just posting frequently. I've been focusing only on content, but now I see how interacting with my audience can make a difference. Time to step up my strategy!
Super helpful article! I always thought Facebook Groups were just for discussions and never really considered them as a tool for growing followers. The idea of actively engaging and sharing valuable content in relevant groups makes so much sense. I'll definitely start participating more and see how it impacts my page. Thanks for the great advice!